amqp, azure, certificate, dns, hostname, message, messaging, port, publish, queue, selfssl, service bus, service bus for windows 1.1, ssl, subscribe, subscription, topic, url
Developing against Service Bus for Windows 1.1
Wouldn’t it be great if we could work on applications that leverage Microsoft Service Bus locally without having to connect to and potentially pay for Microsoft Azure?
Not everyone knows this, but there’s a local counterpart to Microsoft Azure Service Bus in the form of Service Bus for Windows. Those that do know about it know that it doesn’t have a great development story and can be a pain in the arse to set up.
In this post we’ll take the sting out of the process and show you how you can get your local environment set up so you and the rest of your team can develop against Service Bus without using any Microsoft Azure services.
You’ll need an instance of SQL server to which you have admin rights to use Service Bus for Windows.
IMPORTANT: If you have any other service running that use the default AMQP ports 5671, & 5672 then the configuration process will hang and then fail without giving a meaningful error. Ensure that there are no port clashes before continuing.
Install Service Bus for Windows 1.1
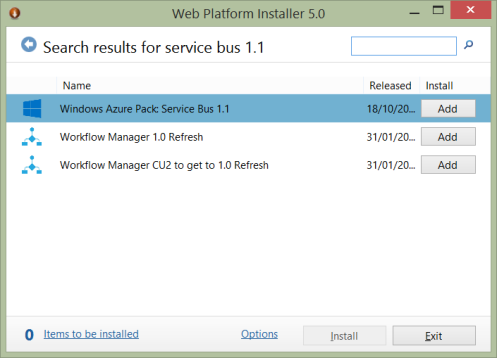
The easiest way to install Service Bus for Windows it to grab the Web Platform Installer if you haven’t got it already. and search for Service Bus 1.1
Click add, then install, and follow the instructions through to completion.
Generating a certificate to use with a custom hostname
One of the most annoying things about Service Bus for Windows is that by default it will install on an endpoint that is named according to your computer name, e,g:
sb://vectron/ServiceBusDefaultNamespace;StsEndpoint=https://servicebus:10355/ServiceBusDefaultNamespace;RuntimePort=10354;ManagementPort=10355
This is pretty useless if you want a configuration that’s going to be common for everyone in your team. It’s not easy, but it is possible to configure Service Bus to use a custom hostname.
To do this you’ll need to generate a self-signed certificate which you can do by using SelfSSL.exe which comes as part of the IIS 6.0 Resource Kit Tools. This comes with a bunch of other cruft you don’t need which you can deselect.
The default install location is C:\Program Files (x86)\IIS Resources\SelfSSL. Choose a hostname – in my case I’m just using ‘servicebus’. Locate the exe and run the following command as an administrator:
SelfSSL /N:CN=servicebus /V:1000 /T

Press ‘y’ when asked if you want to add it to site 1 and ignore the error – both of these things are of no consequence. This will now have added a certificate to the Trusted Root Authorities store of your local machine.
Adding a hosts file entry
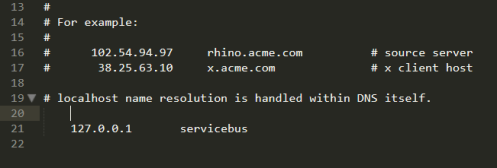
In order to use our custom hostname, we need to add an entry into the hosts file that maps servicebus to localhost. This file can be found in c:\Windows\System32\drivers\etc. It’s read only by default so you may have to change the security settings.
Open this file in a text editor and add a line so it looks like this:
Configuring Service Bus…
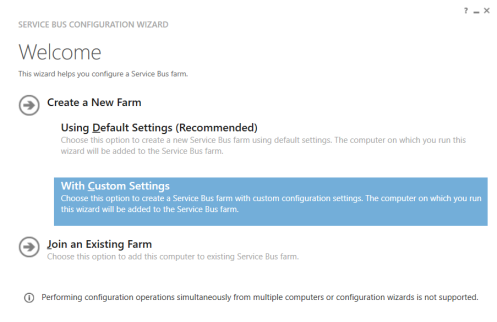
Service Bus was installed in the first step but now we have to configure it. You’ll find a utility called Service Bus Configuration in your start menu which will guide you through the process. Run this and choose to create a new farm with custom settings.
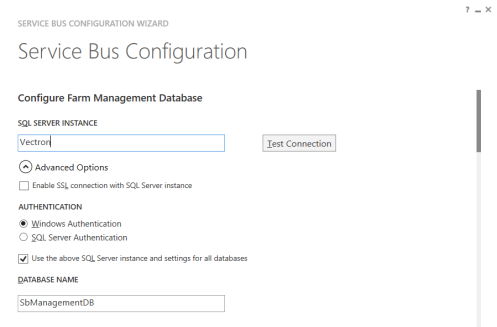
There’s a few things you need to do on this next screen. Firstly, make sure your SQL server details are correctly specified. You can leave all the database name and container settings as standard.
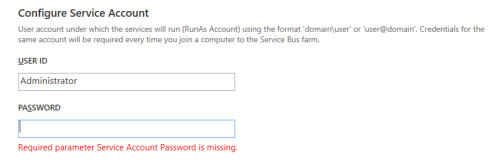
Specify the service account under which Service Bus will be run… this can be any user that has admin rights.
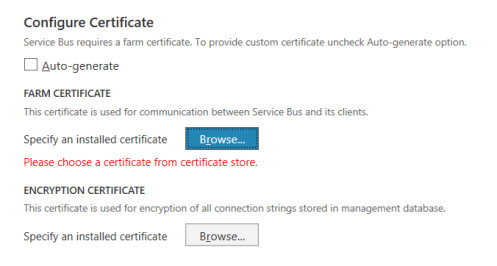
Next we will need to tell the setup process where to find the certificate we generated earlier. Under Configure Certificate, uncheck the auto-generate checkbox.
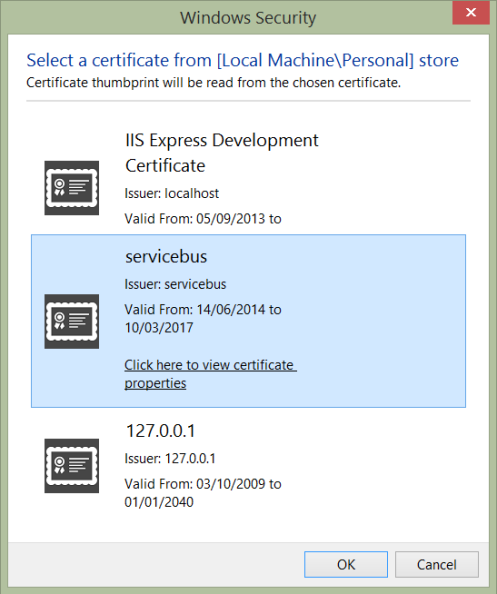
Click each browse button in turn and select the certificate – the name should match the hostname we chose earlier. If there is more than one, check the certificate properties and select the one that does not contain a warning about trust.
Make sure you repeat this for both the farm and the encryption certificate settings.
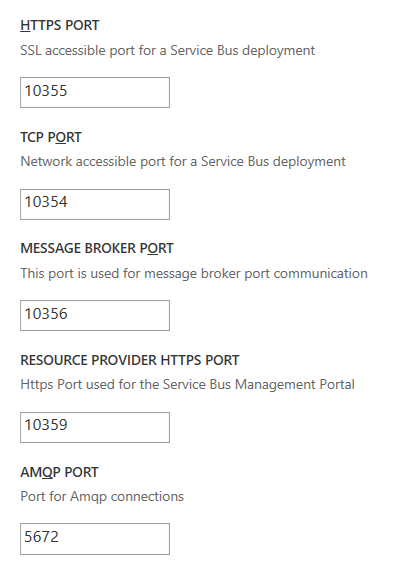
Finally, change the port settings that begin with ‘9’ to start with ’10’ instead… this will avoid some of the more common potential port conflicts which will cause the installation to fail.
Leave the AMQP ports as they are, unless you know for sure that these are in use by another service such as Rabbit MQ.
If there are any other services using the same AMQP ports, Service Bus configuration will hang for a long period of time and then eventually fail, but not give any indication of why!
You may also enter an alternative namespace name instead of the default provided.
That’s all the configuration we need, so hit the arrow to proceed. If everything has been entered correctly, you’ll see a summary of all the information. Click the tick to apply the settings!
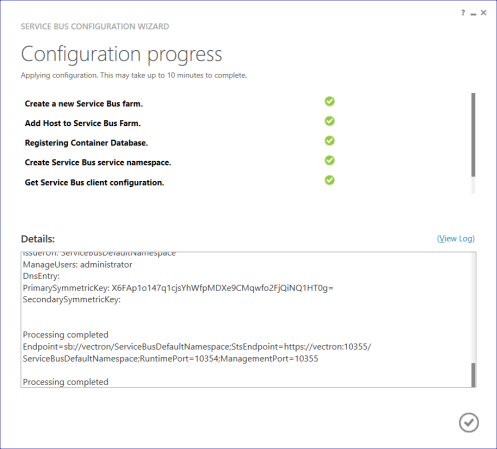
The process may take a few minutes, however you shouldn’t see it go too long without logging progress to the window. If it does hang then see the above advice about ports, and check for other services that may be conflicting. If all is well you should see something like this:
Changing the hostname
You’ll see from the processing completed message that our endpoint still contains the computer name, so we need to run a few powershell commands to change it. Open the Service Bus Powershell prompt from the start menu and type the following as distinct commands, replacing servicebus with your hostname if you chose an alternative.
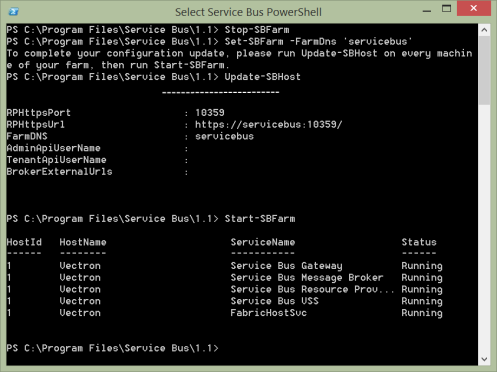
Stop-SBFarm
Set-SBFarm -FarmDns 'servicebus'
Update-SBFarm
Start-SBFarm
The start command may take around 5 minutes to complete, but you should see something like this (edited for brevity):
Now if you open a web browser and navigate to https://servicebus:10355/ServiceBusDefaultNamespace (substitute your host and namespace where appropriate), lo and behold we have a working Service Bus deployment… complete with a valid SSL certificate!
Connecting to your new Service Bus deployment
You can now access your local Service Bus installation and default namespace using the following connection string (again, adjust where appropriate):
Endpoint=sb://servicebus/ServiceBusDefaultNamespace;StsEndpoint=https://servicebus:10355/ServiceBusDefaultNamespace;RuntimePort=10354;ManagementPort=10355
The low-level API exposed by Service Bus for windows is not quite the same as the latest one offered by Microsoft Azure, and as a result you will need to use a different nuget package:
The good news is that Azure Service Bus is backwards compatible so you can use the same 1.1 package for for both development and production. The only downside is that you may not have access to all the very latest features of Azure Service Bus, only those that are common to both deployments.
Accessing Service Bus from an IIS app pool
When we set up the initial configuration, we specified that the users that could manage our namespace were those that were members of the Admin access control group.
If you want to be able to create queues/topics in your new Service Bus deployment from within an IIS hosted web application, you will need to create a new group for these users and then authorise the group with Service Bus. Please note that this is not possible out of the box with Windows 8 Home edition.
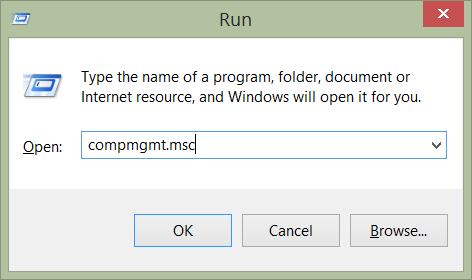
Open up the Computer Management window using the run dialog and typing compmgmt.msc:
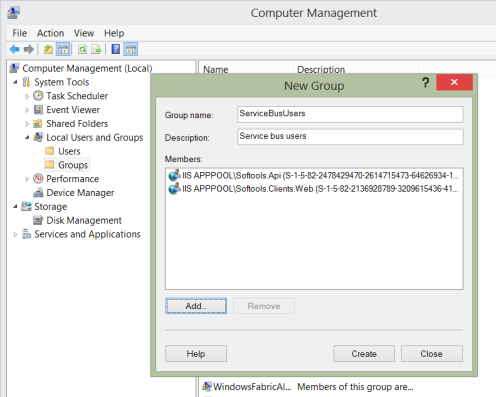
Expand the Local Users and Groups section, right click on Groups and choose New Group. Enter a suitable name and select the relevant users. You may need to quality the names of app pool users with ‘IISAPPPOOL\<user>’ in order to find them.
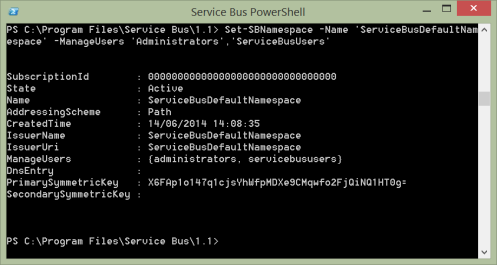
Once the group has been created, return the the Service Bus Powershell prompt and type the following (substitute your namespace name if you chose a different one)
Set-SBNamespace -Name 'ServiceBusDefaultNamespace' -ManageUsers 'Administrators','ServiceBusUsers'
Once this has completed, be sure to restart IIS in order for the changes to take effect otherwise you will continue to receive a 401 not authorised back from Service Bus. You can do this through the management console or by using the run command and typing iisreset.
Summary
In this post we’ve seen how to:
- Install Service Bus for Windows 1.1
- Generate a certificate and add a hosts entry in order to use a custom hostname
- Configure Service Bus using the wizard and the apply the custom hostname
- Use the Service Bus 1.1 nuget package to work with both production and development.
- Authorise IIS app pool users to use Service Bus from within a web application
Hopefully this has helped to demystify Service Bus for windows and demonstrate that although it may lack wider documentation, it is a very robust and viable tool. You can (and should) use it to help develop and accurately test Service Bus applications that will eventually be deployed to Azure.
Please also check out the alpha release of my new project AzureNetQ which provides an easy api for working with Microsoft Service Bus. It’s based on the most excellent Rabbit MQ library EasyNetQ, but please take care as at the moment the documentation is in the progress of being migrated.
All questions welcome in the comments!
Pete
References
http://msdn.microsoft.com/en-us/library/dn282144.aspx
http://www.microsoft.com/web/downloads/platform.aspx
http://support.microsoft.com/kb/840671
https://www.nuget.org/packages/ServiceBus.v1_1/
http://roysvork.github.io/AzureNetQ
http://easynetq.com/
http://social.msdn.microsoft.com/forums/windowsazure/ru-ru/688ada3c-bb95-488d-9ad0-aec297438e1c/problem-starting-message-broker-during-service-broker-configuration
http://stackoverflow.com/questions/22456947/service-bus-for-windows-server-the-api-version-is-not-supported/22622117#22622117
http://social.msdn.microsoft.com/Forums/windowsazure/en-US/c23a7c1f-742d-4d7f-ad4f-3bf149964762/service-bus-for-windows-server-the-api-version-is-not-supported?forum=servbus
http://www.dotnetconsult.co.uk/weblog2/PermaLink,guid,50861acd-6bd1-4283-9fdc-7a611a440829.aspx
https://www.sslshopper.com/article-how-to-create-a-self-signed-certificate-in-iis-7.html
http://msdn.microsoft.com/en-us/library/dn520958.aspx
http://social.msdn.microsoft.com/Forums/windowsazure/en-US/f5096a7a-9605-4231-b093-b7d278be7c20/cant-uninstall-service-bus
From → Service Bus



It looks like for the renaming, Update-SBFarm should actually be Update-SBHost. That being said, I am having problems preventing me from getting past this part of the process so there may be other issues that I am facing as well.
Thanks a lot and it’s very useful and helped lot….
Thanks for this post! I have a problem when configure Azure Pack.
I host this VM in Windows Azure, set public DNS to mymachine.cloudapp.net.
Open ports 10355, and etc.
Create certificate: SelfSSL /N:CN=mymachine.cloudapp.net /V:1000 /T
But when I try to create Namespace in Azure Pack TenantSite, I see an error in ServiceBus Log:
Namespace Provisioning Exception. TrackingId: . SystemId: . Namespace: SomeNamespace. Method: Activating. Exception: System.Net.Http.HttpRequestException: An error occurred while sending the request. —> System.Net.WebException: The underlying connection was closed: Could not establish trust relationship for the SSL/TLS secure channel. —> System.Security.Authentication.AuthenticationException: The remote certificate is invalid according to the validation procedure.
When I try to connect to ServiceBusDefaultNamespace via SAS, it works fine.
(sets: New-SBAuthorizationRule -NamespaceName ServiceBusDefaultNamespace -Name MainRule -Rights Manage, Listen)
I’ll trying to create another certificate with C:\Program Files (x86)\Windows Kits\8.1\bin\x64\makecert.exe:
makecert.exe -r -pe -n “CN=mymachine.cloudapp.net” -ss My -sr “LocalMachine” -eku 1.3.6.1.5.5.7.3.2 -len 2048 -e 03/03/2033 -sky Exchange “mymachine.cloudapp.net.cer”
That’s also cant create Namespace via TenantSite. 😦
What can be wrong? Please, help!
Actually, setting internal communication port range to 10000 -10004 might not be a good idea. Windows Azure Storage Emulator uses ports 10000-10002.
Good point, thanks for sharing. Since writing this guide I have since found out that it should be fine to keep the default ports.
Excactly what I ended up doing. Rest of your post was really helpful though, thanks 🙂